- Current location:
Technical Strength
技术支持
Design Selection and Example
Radiator Selection:
1、According to the principle of matching the heat consumption of the room with the heat dissipation of the radiator, the type selection is carried out.
2、Give consideration to the comfort and beauty of the room to determine the type of radiator in line with it.
3、Calculating Method of Radiator Selection:A= Q q*β1*β2*β3
According to the inlet and outlet water temperature of the radiator, the average water temperature of the radiator can be calculated.:T jp= T in+T out 2
Calculate the temperature difference of heat dissipation according to the indoor design temperature:△T=T jp-T 内
According to the △T heat sink selection table, the heat dissipation of a single chip can be obtained.q.
β1:Correction coefficient of heat sink number
| Number of slices per group | <6 | 6-10 | 11-12 | >20 |
| β1 | 0.95 | 1.00 | 1.05 | 1.1 |
β2:Correction of Connection Form of Radiator
| Connection form | lateral bottom in and out | ipsilateral up-down | ipsilateral up-down | lateral down-in and out | ipsilateral down-in and up-out | ipsilateral entry and exit |
| β2 | 0.97(Partitions)
0.89(No partitions) |
1.00 | 1.004 | 1.239 | 1.422 | 1.426 |
β3:Correction of Radiator Installation Form
| Installation form | β>3 |
| The distance between the upper part of the radiator and the wall in the groove of the wall (semi-concealed) 100MM | 1.06 |
| Open but the upper part of the radiator is covered with a windowsill. The radiator is away from the height of the windowsill 150MM | 1.02 |
| Inside the hood, the upper part is open and the lower part is away from the ground 150MM | 0.95 |
| Installed in the hood, upper and lower openings, opening height are all 150MM | 1.04 |
| Wall mounted decoration | 1 |
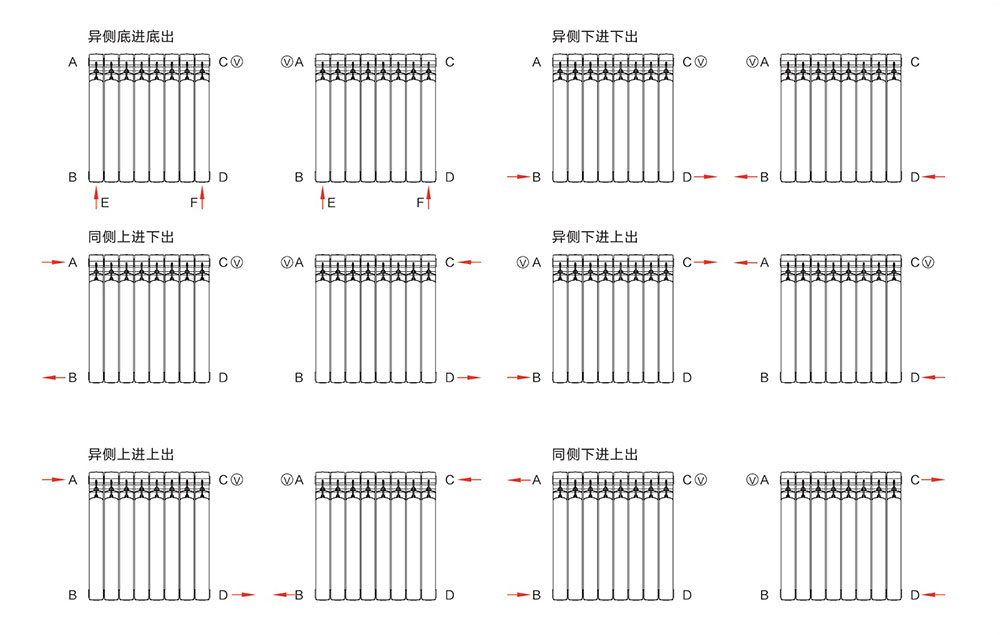
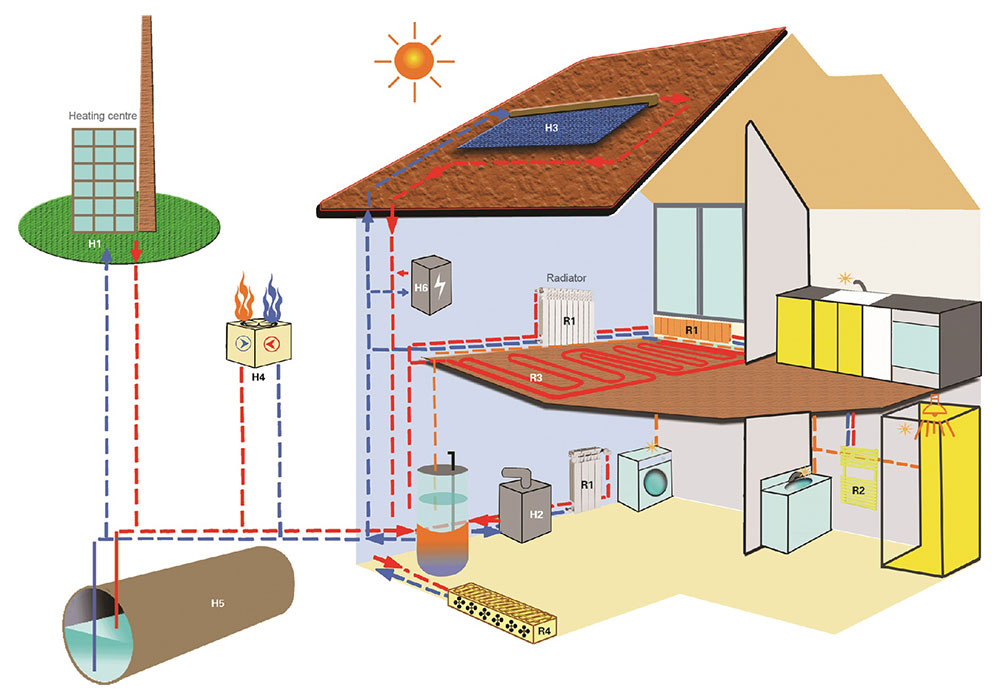
Connection form of radiator (A, B, C, D, E, F represent interface position, V represent exhaust valve position, arrow represent water flow direction)
Notices for Design and Installation
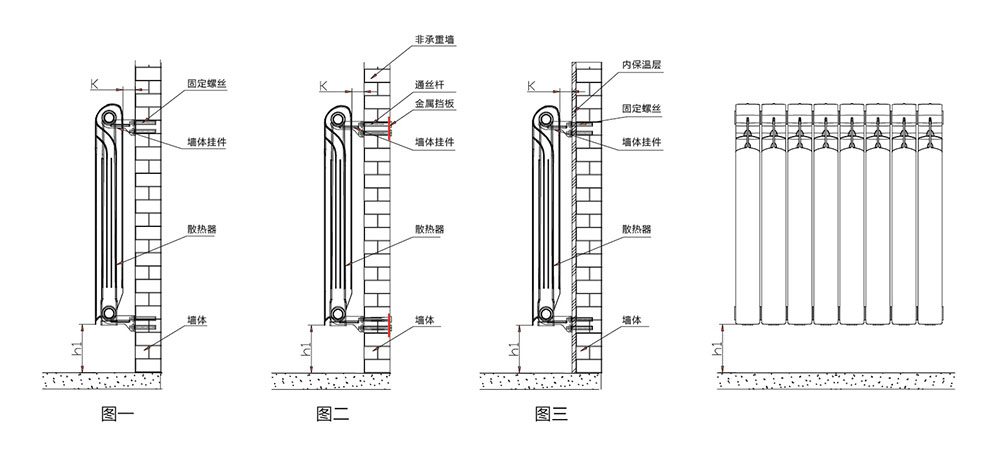
Radiator installation:
1. Load-bearing wall installation (Fig. 1): the installation height of radiator bottom from the ground h (> 100MM). Fixed bolt positioning dimensions for different types of products are shown in the chart.
2. Installation of non-load-bearing wall (Fig. 2): In this case, it is necessary to punch through the hole of the wall, penetrate through the screw rod, and fix the steel plates on both sides of the screw wall. The length, width and thickness of the steel plates should not be less than 30*30*3 (MM), and the installation dimension of the solid wall should be the same.
3. Installation of internal thermal insulation wall (Fig. 3): In this case, expansion bolts must penetrate the internal thermal insulation layer and penetrate into the wall. The length of penetration into the wall is not less than 50MM, and the installation dimension is the same as that of solid wall.
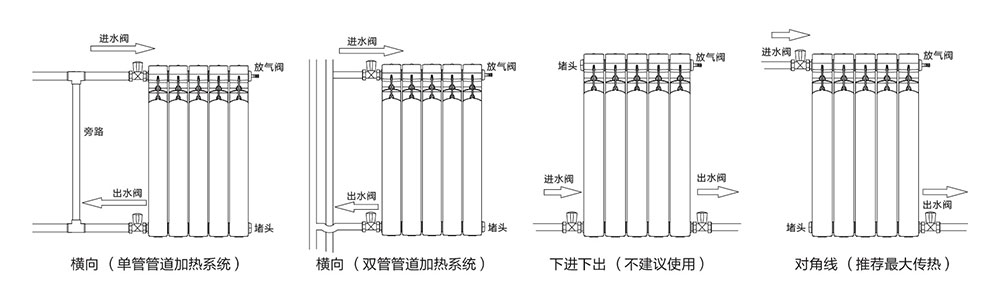
Method of connecting radiator:
Cautions for Radiator Installation:
1. When installing, make sure that the distance between the bottom of the radiator and the ground is not less than 100MM, and the distance between the top of the radiator and the top of the radiator is not less than 100MM.
2. Installation should ensure that the top of the radiator is straight, with a slightly higher wind end, so as to facilitate the emission of gas in the radiator.
3. Pipelines and radiators should be beautifully arranged, but they must meet the requirements of relevant specifications, but ensure safety and convenient maintenance.
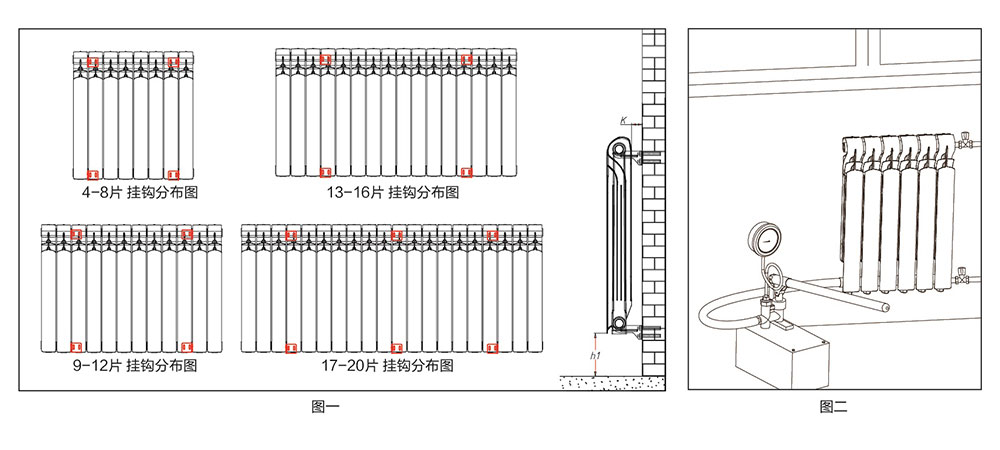
4. The radiator hook should be fixed on the load-bearing wall. The distance between hooks should be based on the distance between the radiator and the corresponding sheets. It is not suitable to concentrate or disperse excessively. When long sheets are encountered, the number of hooks should be increased appropriately, and the height should be determined by the height of the radiator. The hook should be in line with the horizontal and vertical directions on the wall. If the wall is not a load-bearing wall, the metal baffle should be padded before hanging. Distribution of installation spacing of hooks is shown in Fig. 1.
5. The radiator should be packaged to protect the appearance of the radiator.
6. Hydraulic test should be carried out after installation of heating system (fig. 2). Hydraulic test should be carried out on the radiator after installation. The test pressure should be 1.5 times of the working pressure.
7. The water quality of heating system should meet the requirements of GB1576 "Water Quality of Low Pressure Boiler".
Cautions for installation of radiator pipes:
1. Radiator branch pipe should have more than 1% installation gradient in order to facilitate gas emission in the pipeline.
2. Valves should be installed at the inlet and outlet of each group of radiators. In order to facilitate full water maintenance of radiators in non-heating season.
3. When choosing aluminium-plastic composite pipes and other key pipes, it is necessary to confirm that the pipes are heating and hot water pipes, and the pipes should meet the relevant national or industry standards. The pressure of pipe and fittings should be no less than the experimental pressure of pipe network system.
4. When pipelines pass through walls and floors, protective sleeves should be installed.
5. When plastics pipes are installed in plastics, pipe cards should be installed every 300 mm.
6. If the temperature control valve is installed, the temperature control valve should be installed at the intake, and should be installed horizontally. If affected by space, the temperature control valve can be installed vertically upward but not downward. When installing the temperature control valve head, pay attention to the scale up for observation. .5 times.
7. For the hot water heating system under 100 ~C, the water quality should reach: PH value (20 ~C), pure aluminium 6-8.5, steel aluminium 7-12, conductivity ≤250ms/m, CI-1≤100mg/l, and O2≤100mg/l.
Installation method of steel plate radiator:
| L(MM) | X | D | E | NUMBER OF STENTS | |||
| 11 | 10、20、21、22、33 | 11 | 10、20、21、22、33 | 11 | 10、20、21、22、33 | ||
| 400MM | 117 | 100 | 166 | 200 | 2 | ||
| 500MM | 117 | 100 | 266 | 300 | 2 | ||
| 600MM | 117 | 100 | 366 | 400 | 2 | ||
| 700MM | 117 | 100 | 466 | 500 | 2 | ||
| 800MM | 117 | 100 | 566 | 600 | 2 | ||
| 900MM | 117 | 100 | 666 | 700 | 2 | ||
| 1000MM | 117 | 100 | 766 | 800 | 2 | ||
| 1100MM | 117 | 100 | 866 | 900 | 2 | ||
| 1200MM | 117 | 100 | 966 | 1000 | 2 | ||
| 1400MM | 117 | 100 | 1166 | 1200 | 2 | ||
| 1600MM | 117 | 100 | 1366 | 1400 | 2 | ||
| 1800MM | 117 | 100 | 800 | 800 | 766 | 800 | 3 |
| 2000MM | 117 | 100 | 900 | 900 | 866 | 900 | 3 |
| 2200MM | 117 | 100 | 1000 | 1000 | 966 | 1000 | 3 |
| 2600MM | 117 | 100 | 1200 | 1200 | 1166 | 1200 | 3 |
| 3000MM | 117 | 100 | 1400 | 1400 | 1366 | 1400 | 3 |
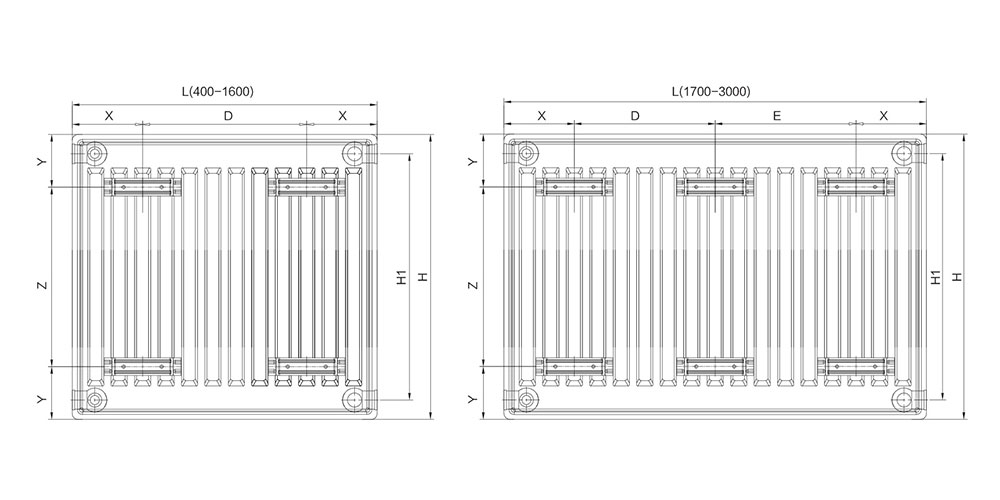
Installation method of steel plate radiator:
| HEIGHT OF RADIATOR | H1(mm)G1/2 | H1(mm)G3/4 | Y(mm) | Z(mm) |
| 305 | 250 | 245 | 75 | 155 |
| 405 | 350 | 345 | 125 | 155 |
| 505 | 450 | 445 | 125 | 255 |
| 555 | 500 | 495 | 125 | 305 |
| 605 | 550 | 545 | 125 | 355 |
| 655 | 600 | 595 | 125 | 405 |
| 705 | 650 | 645 | 125 | 455 |
| 905 | 850 | 845 | 125 | 655 |


全球空气污染现状
| 伦敦 | 1952年12月5日至10日。发生了“伦敦烟雾事件”,这4天里,伦敦市死亡人数就高达4000人。 |
| 美国 | 美国环保署在1997年7月率先提出将PM2.5作为全国环境空气质量标准,并在2006年对标准进行了完善。 |
| 日本 | 2007年,633名1996年至2006年间东京大气污染公害的受害者向日本政府、东京都政府、首都高速道路公团以及丰田汽车等8家汽车公司提起诉讼。东京大气污染诉讼案推动了地方政府对PM2.5的立法。 |
| 意大利 | 2011年8月,意大利米兰大雾弥漫空气污染严重,学校放假。 |
| 墨西哥 | 2011年12月13日,墨西哥城笼罩在一片阴霾中。 |
| 韩国 | 2013年12月6日,韩国釜山遭受严重雾霾侵袭,城市能见度很低。 |
| 巴西 | 2012年2月7日,巴西圣保罗,天空笼罩在一片阴霾中。 |
| 伊朗 | 2012年12月4日,伊朗德黑兰空气污染严重。 |

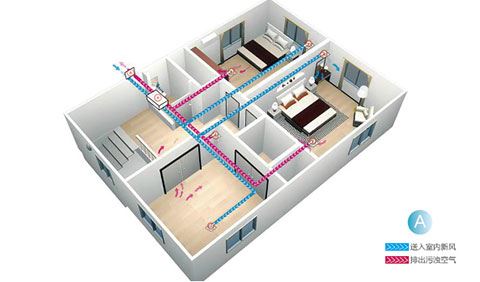
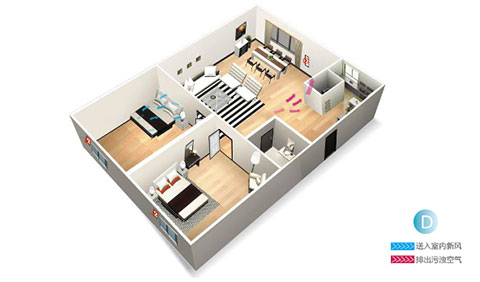
您的家需要多少新风 居住建筑设计最小换气次数
| 房间面积S | 房屋高度H | 房间人数N | 新风量/人 | 新风量/m² |
| 120m² | 3m | 4 | 30m²/h | 0.7 |
人数计算:Q1(需总新风量)=4(人数)*30(新风量/人)=120(m²)
空间计算:Q2(需总新风量)=0.7(新风量/m²)*120(房间面积)*3(房屋高)=252(m²/h)
注:由于Q2>Q1,故取Q2为最终房间所需要的新风量,作为设备选项的依据;结合产品型号,可选用本
公司的OHE250B/DP的新风热交换产品。(参数详见下表)
不同类型建筑新风量标准
| 办公建筑类调室 | 宾馆类建筑空调室 | 娱乐建筑类空调室 | 民居类建筑空调室 | ||||
| 房间类型 | 新风量 | 房间类型 | 新风量 | 房间类型 | 新风量 | 房间类型 | 新风量 |
| 一般办公室 | 30 | 宾馆客房 | 30-50 | 练功房/健身房 | 60-80 | 一般别墅公寓 | 30 |
| 高级办公室 | 30-50 | 接待室 | 30-50 | 壁球/网球 | 40 | 高级别墅公寓 | 50 |
| 会议/接待室 | 30-50 | 餐厅/宴会厅 | 15-30 | 棋牌室/台球室 | 40-50 | 商场 | 15-25 |
| 电话总机房 | 30 | 咖啡厅 | 20-5 | 游泳池 | 50 | 病房 | 50 |
| 计算机房 | 30 | 多功能厅 | 15-25 | 游戏机房 | 40-50 | 教室 | 11-30 |
| 复印机房 | 30 | 商务中心 | 10-20 | 休闲/录像厅 | 20 | 展览馆 | 20-30 |
| 实验室 | 20-30 | 门厅/大厅 | 10 | 按摩厅 | 30 | 影剧院 | 15-25 |
| 舞厅 | 30 | 美容室 | 35 | 更衣室 | 30 | ||
| 酒吧 | 17-50 | 歌厅/KTV | 30-50 | 夜总会 | 20 | ||
新风换气次数参考表
| 房间类型 | |||||||||
| 不吸烟 | 少量吸烟 | 大量吸烟 | |||||||
| 公寓 | 商场 | 计算机房 | 病房 | 公寓 | 办公室 | 餐厅 | KTV | 会议室 | |
| 别墅 | 别墅 | 酒吧 | |||||||
| 宾馆 | |||||||||
| 新风换气次数 | 0.4-0.7 | 1.6-3.9 | 1.1-2.7 | 0.5-1.3 | 0.5-1.0 | 1.1-2.7 | 1.3-3.1 | 1.9-4.7 | 2.1-7.8 |
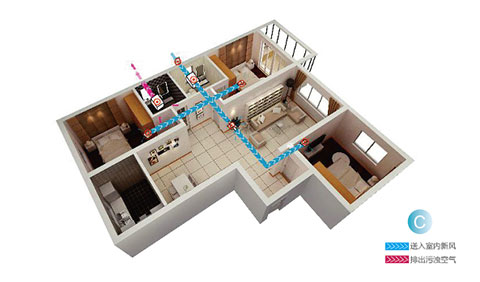
室内换气提案


Contact information
Moble phone:
Email:
Add: